How to fix the Serial Arduino UWP example?
It would be really cool to be able to communicate with an Arduino microcontroller board from a Windows 10 UWP application. Basically this can be done in several ways:
- Serial communication through the USB cable
- Bluetooth communication
- Wifi communication
The most simple one seems to be the USB cable based serial communication. Microsoft provides a sample project to demonstrate such connection in the Windows universal samples GitHub repository.
The hardware requirements of this example are the followings:
- Any Arduino board - Arduino Uno is preferred
- 4 LEDs
- Resistors - 4 220 Ohm Resistor for the LED
- Wires
- Solderless breadboard
- LM35 temperature sensor
The example should find the Arduino board, which is connected to the Windows 10 device. After a successful connection the User could blink the 4 LEDs and retrieve the current temperature in celsius from the attached sensor.
Problems
Personally I thought that this example will work out of the box, because the Arduino board was programmed throught the same USB serial connection, which gets used by this example. When I assembled the circuit and uploaded the given sketch to my Arduino board, nothing happened.
I tried the example with an Arduino Nano clone. First I thought that this is the case. The board could be incompatible with this example. Microsoft seems to favor the original Arduino Uno board. I guess they tested the example with it. I had an Arduino Mega 2560, but no geniue Arduino Uno. I decided to buy one! I also didn’t want to wait until it arrives, instead I started to investigate what the problem can be.
First I started to test the given sketch on my Arduino Mega 2560 board. I tried to make it work from the Serial Monitor window. It didn’t work… Thankfully the code is open source, so I could have a look what is going on! It turned out that the Arduino Serial Command library expects a carriage return - \r - character at the end of each command. By default Serial Monitor sends two characters on Windows 10 to the board after each input - \r and \n - carriage return and line feed. Fortunately this can be changed to carriage return in the dropdown on the Serial Monitor window:
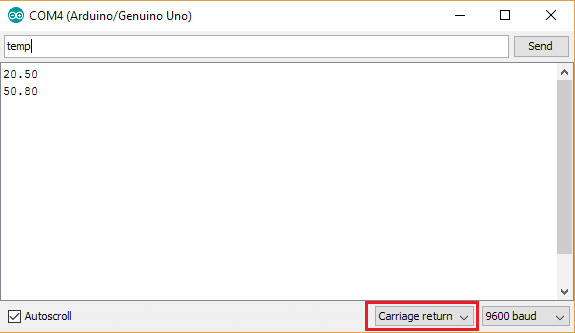
Once I did that I was able to blink the 4 LEDs. All you have to do is to type the followings and hit Send:
- ledon
- e.g. ledon 5 - ledoff
- e.g. ledoff 5
In order to get back the temperature information you have to type temp into the Serial Monitor and hit Send. Unfortunately I don’t have a LM35 temperature sensor, but I have a DHT22 sensor from Keyes Studio, which can measure temperature and humidity. I replaced the temperature retrieval related code with a DHT sensor compatible version based on Adafruit DHT sensor tutorial. After that I was able to got back the temperature and the humidity information in the Serial Monitor window.
It proves that the Arduino sketch works now and the problem is with the SerialArduino UWP example. I scanned through the available documentation and found out in the Windows.Devices.SerialCommunication namespace description, that the application package manifest file has to contain the right Vid and Pid numbers. Fortunately the Get Board info menu item in the Arduino IDE reveals the correct numbers:
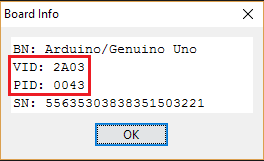
I fixed that in the example, so now my Arduino board was discovered by the sample and I was able to connect to it.
Oddly enough at this time I was able to blink the LEDs in the UWP sample application and the temperature information came back nicely. When I disconnected my Arduino board and reconnected again I had the same experience. The board was discovered, but the example didn’t work. I figured out that the followings can make it work:
- Connect the Arduino board to the Windows 10 device
- Open Arduino IDE
- Upload the sketch to the board
- Open the Serial Monitor window in Arduino IDE
- Test the sketch with some sample commands - e.g. temp, ledon 4, ledoff 4
- Close the Serial Monitor window
- Open the SerialArduino UWP example
- Connect to the Arduino board
- Blink the LEDs or retrieve the temperature from the sensor
Basically I used the Serial Monitor in Arduino IDE to setup a serial connection with the right parameters. I could have stopped at this point, but I wanted to make the example work without this Serial Monitor hack.
Arduino side changes
As I mentioned previously instead of the LM35 temperature sensor, I used a DHT22 sensor from Keyes Studio. The updated circuit diagram looks like this:
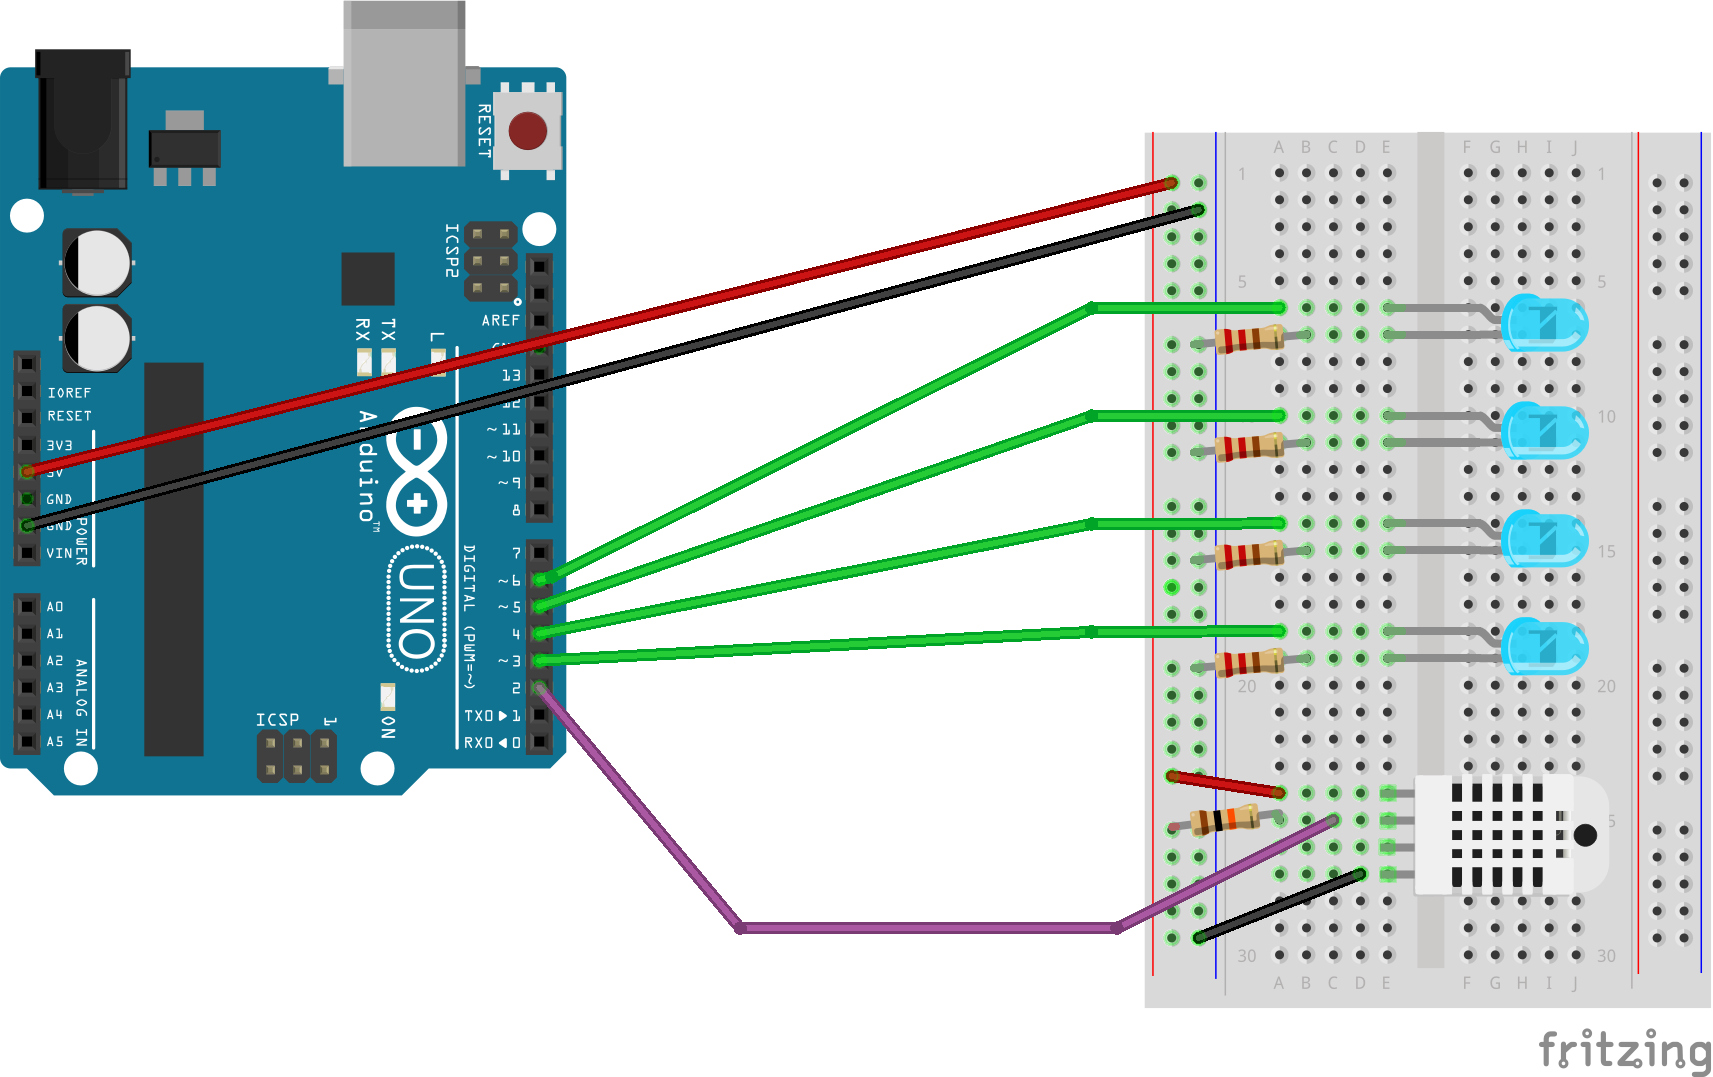
In short I had to get rid of all code, which belongs to the LM35 temperature sensor. I used the Adafruit DHT sensor library in order to retrieve the temperature and humidity information:
1 | // |
Finally a new command - hum - was registered in order to be able to request the humidity value:
1 | DBGMSG(F(" temp - read temperature" )); |
The final Arduino sketch can be found on GitHub in my fork. It has to be uploaded to the Arduino microcontroller board before the SerialArduino UWP example gets used.
UWP sample fix
As I said before the right Vid and Pid numbers have to be declared in the App package manifest file:
1 | <Capabilities> |
The Vid and Pid based Device Id reference was commented out, because it can be any to allow access to any device that matches the function type. If the Vid and Pid based identification gets used then the right values have to be reflected in the Constants.cs file as well:
1 | public class ArduinoDevice |
Now we are able to connect to the device, but there is a discrepancy about how the connection was initialised in the Arduino IDE based Serial Monitor and in the example code. This is the reason why the sample works after some testing in the Serial Monitor.
In order to make the sample code work without the Serial Monitor the following device details have to be specified in the OnNavigatedTo method of the Scenario2_LEDTemp.cs class. The most important ones are the BaudRate, WriteTimeout and ReadTimeout properties:
1 | //Set device connection defaults for Read and Write |
Add humidity retrieval
The DHT22 sensor is able to provide the humidity information besides the current temperature. It makes sense to display it on the screen as well:
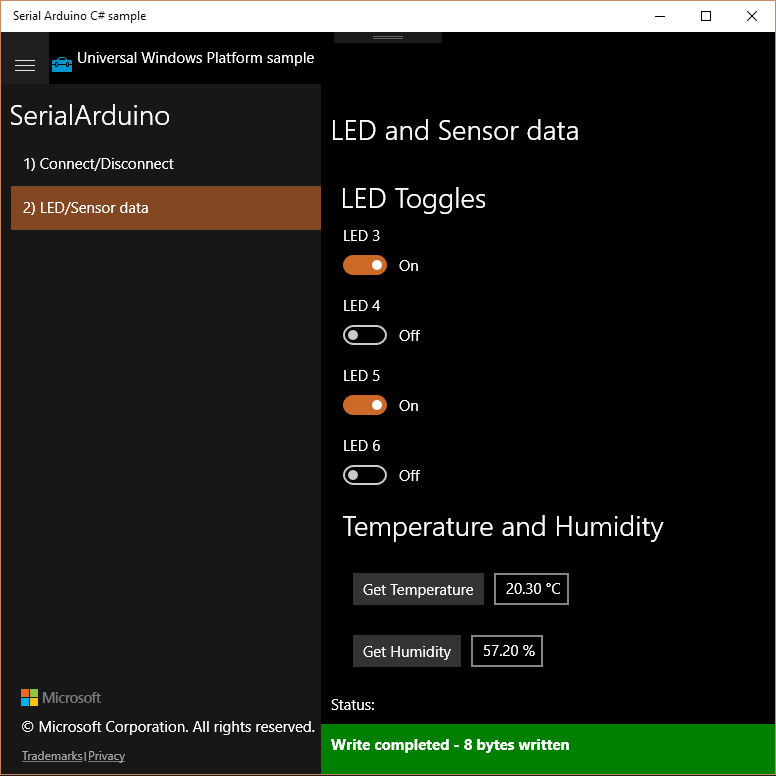
Display device name
By default the device Instance Id gets displayed on the Device Selection page. It would be nice to display the name of the device instead of the id. This can be done with the following line in the Constants.cs file:
1 | public class DeviceProperties |
The end result will look like this:
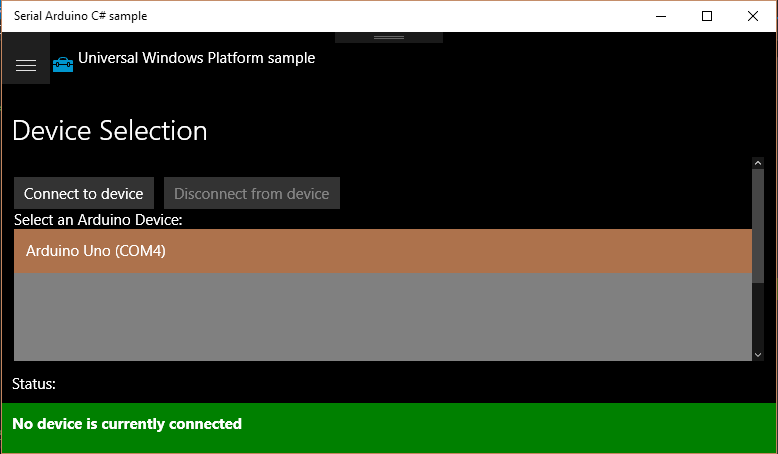
Fortunately the device name contains the communication port identifier as well, which is a nice value added feature.
Source code location
The source code of the modified example can be found on GitHub in my fork on the fix-SerialArduino branch of the Universal Windows Platform (UWP) app samples repository.

